4. Build a Scalable Solution in Azure
Note!
This exercise can be rather costly, so please do not forget to decommission everything when you are done. Don´t leave it overnight.
Overview
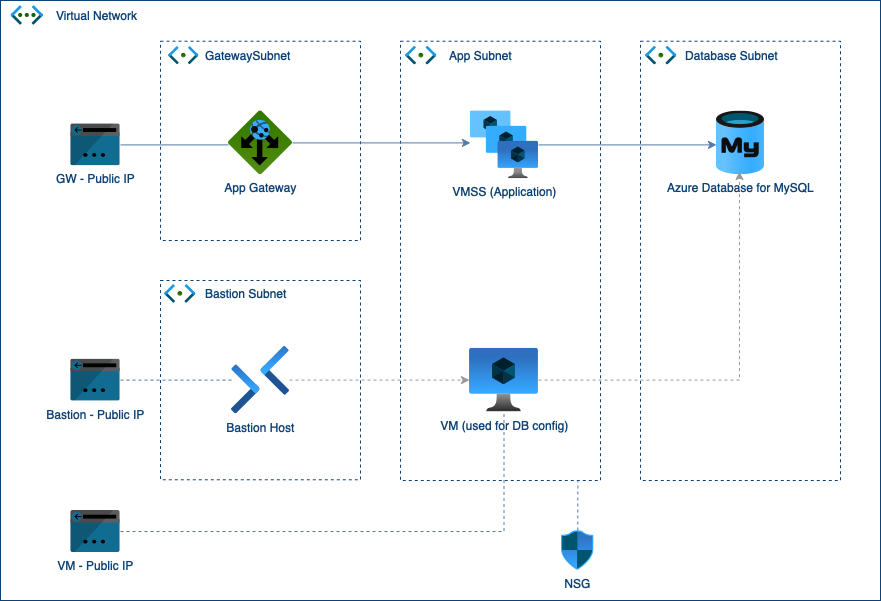
In this exercise, you will create a secure, multi-tier architecture in Azure using the Azure Portal. You will set up:
- A Virtual Network (VNet) with four subnets for different tiers: AppGateway, Application, Database and BastionHost.
- An Azure Bastion Host for secure remote access to resources within the VNet.
- An Azure Database for MySQL Flexible Server in the Database subnet.
- A Virtual Machine Scale Set (VMSS) in the Application subnet.
- An Application Gateway in the Gateway subnet for managing HTTP traffic.
- An App Server (used as Provisioning Server to configure the database)
1. Create a Resource Group
- Navigate to the Azure Portal.
- Go to Resource Groups > + Create.
- Enter the following details:
- Resource Group Name:
DemoRG - Region:
North Europe
- Resource Group Name:
- Click Review + Create > Create.
2. Create a Virtual Network And Subnets
- Navigate to Virtual Networks > + Create.
- Enter the following details:
- Name:
DemoVnet - Region:
North Europe - Address Space:
10.0.0.0/16
- Name:
- Click Next: IP Addresses and add the following subnets:
- Gateway Subnet: (edit default)
- Name:
DemoGatewaySubnet - Address Range:
10.0.0.0/24
- Name:
- App Subnet:
- Name:
DemoAppSubnet - Address Range:
10.0.1.0/24
- Name:
- Database Subnet:
- Name:
DemoDatabaseSubnet - Address Range:
10.0.2.0/24
- Name:
- Bastion Subnet:
- Name:
AzureBastionSubnet - Address Range:
10.0.3.0/27
- Name:
- Gateway Subnet: (edit default)
- Click Review + Create > Create.
3. Create a Network Security Group For The App Subnet
Navigate to Network Security Groups > + Create.
Enter the following details:
- Name:
DemoAppSubnetNSG - Region:
North Europe - Resource Group:
DemoRG
- Name:
Click Review + Create > Create.
Add the following inbound rules:
- Allow SSH:
- Protocol:
TCP - Port Range:
22 - Priority:
1000
- Protocol:
- Allow HTTP:
- Protocol:
TCP - Port Range:
80 - Priority:
2000
- Protocol:
- Allow SSH:
Associate the NSG with the App Subnet:
- Navigate to Virtual Networks > DemoVnet > Subnets.
- + Associate >
DemoVnet>DemoAppSubnet> OK
4. Create Public IPs
- Navigate to Public IP Addresses > + Create.
- Create two public IPs:
- For Application Gateway:
- Name:
AppGateway-PublicIP - SKU:
Standard
- Name:
- For Bastion Host:
- Name:
Bastion-PublicIP - SKU:
Standard
- Name:
- For Application Gateway:
5. Create an Azure Database for MySQL Flexible Server
Navigate to Azure Database for MySQL Flexible Server > + Create.
Advanced Create:
- Server Name:
demodbcampus24 - Resource Group:
DemoRG - Region:
North Europe - Administrator Username:
adminuser - Password:
SecurePassword123!
Network Tab
- Connectivity method: Private access (VNet Integration)
- VNet:
DemoVnet - Subnet:
DemoDatabaseSubnet
- Server Name:
Click Review + Create > Create.
6. Create a Virtual Machine Scale Set
Navigate to Virtual Machine Scale Sets > + Create.
Enter the following details:
Basic Tab:
- Resource Group:
DemoRG - Name:
DemoAppVMSS - Region:
North Europe(Same as Resource Group) - Orchestration mode:
Uniform - Instance count:
2(Scaling mode: Manually update the capacity: Maintain a fixed amount of instances) - Image:
Ubuntu 24.04 LTS - x64 Gen2 - Size:
Standard_B1s
Network Tab:
Virtual network:
DemoVnetEdit NIC:
- Subnet:
DemoAppSubnet - NIC network security group:
None(It will get the NSG from the subnet, which we provisioned earlier) - Public IP address: None (For demo purposes, you can enable a public IP for each individual VM here).
- Subnet:
Management Tab:
- Upgrade policy: Automatic
Health Tab:
- Enable application health monitoring: Enable
Advanced Tab:
- Custom data
#cloud-config package_update: true packages: - nginx - php-fpm - php-mysql write_files: - path: /var/www/html/info.php content: | <?php phpinfo(); ?> - path: /var/www/html/index.html content: | <!DOCTYPE html> <html lang="en"> <head> <meta charset="UTF-8"> <meta name="viewport" content="width=device-width, initial-scale=1.0"> <title>Contact Form</title> </head> <body> <h1>Contact Us (VMSS)</h1> <form action="on_post_contact.php" method="post"> <label for="name">Name:</label><br> <input type="text" id="name" name="name" required><br><br> <label for="email">Email:</label><br> <input type="email" id="email" name="email" required><br><br> <label for="message">Message:</label><br> <textarea id="message" name="message" rows="5" required></textarea><br><br> <button type="submit">Submit</button> </form> </body> </html> - path: /var/www/html/on_post_contact.php content: | <?php // Database credentials $servername = "demodbcampus24.mysql.database.azure.com"; $username = "php_user"; $password = "secure_password"; $dbname = "contact_db"; // Establish database connection // SSL configuration $ssl_options = array( MYSQLI_OPT_SSL_VERIFY_SERVER_CERT => true ); $conn = mysqli_init(); $conn->options(MYSQLI_OPT_SSL_VERIFY_SERVER_CERT, true); // Verify the server certificate $conn->ssl_set(null, null, null, null, null); // Default SSL setup if (!$conn->real_connect($servername, $username, $password, $dbname, 3306, null, MYSQLI_CLIENT_SSL)) { die("Connection failed: " . mysqli_connect_error() . "\n"); } // Collect and sanitize form data $name = htmlspecialchars($_POST['name']); $email = htmlspecialchars($_POST['email']); $message = htmlspecialchars($_POST['message']); // Prepare and bind SQL statement $stmt = $conn->prepare("INSERT INTO contacts (name, email, message) VALUES (?, ?, ?)"); $stmt->bind_param("sss", $name, $email, $message); // Execute the query if ($stmt->execute()) { echo "Thank you! Your message has been sent."; } else { echo "Error: " . $stmt->error; } // Close connections $stmt->close(); $conn->close(); ?> - path: /etc/nginx/sites-available/default content: | server { listen 80; server_name _; root /var/www/html; index index.php index.html index.htm index.nginx-debian.html; location / { try_files $uri $uri/ =404; } location ~ \.php$ { include snippets/fastcgi-php.conf; fastcgi_pass unix:/var/run/php/php8.1-fpm.sock; # Adjust PHP version if necessary fastcgi_param SCRIPT_FILENAME $document_root$fastcgi_script_name; include fastcgi_params; } } runcmd: - systemctl restart nginx - sed -i "s/VMSS/$(shuf -i 1000-9999 -n 1)/" /var/www/html/index.html- Resource Group:
Click Review + Create > Create.
7. Create an Application Gateway
- Navigate to Load Balancers > Application Gateway > + Create.
- Enter the following details:
- Resource Group:
DemoRG - Name:
DemoAppGateway - Region:
North Europe - Tier (SKU):
Basic - Virtual network:
DemoVnet - Subnet:
DemoGatewaySubnet
- Resource Group:
- Configure Frontend IP:
- Public IPv4 address:
AppGateway-PublicIP
- Public IPv4 address:
- Configure Backend Pool:
- Add Backend Pool:
backendpool - Target type:
VMSS - Target:
DemoAppVMSS - Add
- Add Backend Pool:
- Configuration:
- Add a routing rule
- Rule name:
rule - Priority:
100 - Listener name:
listener - Target type:
backendpool - Backend settings: Add new ->
backendsettings-> Add - Add
- Click Review + Create > Create.
8. Create an App Server
Navigate to Virtual Machines > Create:
- Resource Group:
DemoRG. - Virtual Machine Name:
DemoAppServer. - Region:
North Europe. - Image:
Ubuntu 22.04 LTS. - Size:
Standard_B1s(suitable for small workloads). - Administrator Account:
- Authentication Type: SSH public key.
- Username:
azureuser. - SSH Public Key: Generate new key pair.
Configure Networking:
- Resource Group:
Network Interface:
- Virtual Network: Select
DemoVnet. - Subnet: Select
DemoAppSubnet. - Public IP: No Public IP (use Bastion for access).
- NIC Network Security Group: None (rely on the subnet-level NSG
DemoAppSubnetNSG).
Configure Advanced Settings:
- Virtual Network: Select
Custom Data:
#cloud-config
package_update: true
packages:
  - mysql-client
  - nginx
  - php
  - php-fpm
  - php-mysql
write_files:
  - path: /var/www/html/info.php
    content: |
      <?php phpinfo(); ?>
  - path: /var/www/html/index.html
    content: |
      <!DOCTYPE html>
      <html lang="en">
      <head>
          <meta charset="UTF-8">
          <meta name="viewport" content="width=device-width, initial-scale=1.0">
          <title>Contact Form</title>
      </head>
      <body>
          <h1>Contact Us</h1>
          <form action="on_post_contact.php" method="post">
              <label for="name">Name:</label><br>
              <input type="text" id="name" name="name" required><br><br>

              <label for="email">Email:</label><br>
              <input type="email" id="email" name="email" required><br><br>

              <label for="message">Message:</label><br>
              <textarea id="message" name="message" rows="5" required></textarea><br><br>

              <button type="submit">Submit</button>
          </form>
      </body>
      </html>
  - path: /var/www/html/on_post_contact.php
    content: |
      <?php
      // Database credentials
      $servername = "demodbcampus24.mysql.database.azure.com";
      $username = "php_user";
      $password = "secure_password";
      $dbname = "contact_db";

      // Establish database connection

      // SSL configuration
      $ssl_options = array(
          MYSQLI_OPT_SSL_VERIFY_SERVER_CERT => true
      );

      $conn = mysqli_init();
      $conn->options(MYSQLI_OPT_SSL_VERIFY_SERVER_CERT, true); // Verify the server certificate
      $conn->ssl_set(null, null, null, null, null); // Default SSL setup
      if (!$conn->real_connect($servername, $username, $password, $dbname, 3306, null, MYSQLI_CLIENT_SSL)) {
          die("Connection failed: " . mysqli_connect_error() . "\n");
      }

      // Collect and sanitize form data
      $name = htmlspecialchars($_POST['name']);
      $email = htmlspecialchars($_POST['email']);
      $message = htmlspecialchars($_POST['message']);

      // Prepare and bind SQL statement
      $stmt = $conn->prepare("INSERT INTO contacts (name, email, message) VALUES (?, ?, ?)");
      $stmt->bind_param("sss", $name, $email, $message);

      // Execute the query
      if ($stmt->execute()) {
          echo "Thank you! Your message has been sent.";
      } else {
          echo "Error: " . $stmt->error;
      }

      // Close connections
      $stmt->close();
      $conn->close();
      ?>
  - path: /etc/nginx/sites-available/default
    content: |
      server {
          listen 80;
          server_name _;

          root /var/www/html;
          index index.php index.html index.htm index.nginx-debian.html;

          location / {
              try_files $uri $uri/ =404;
          }

          location ~ \.php$ {
              include snippets/fastcgi-php.conf;
              fastcgi_pass unix:/var/run/php/php8.1-fpm.sock; # Adjust PHP version if necessary
              fastcgi_param SCRIPT_FILENAME $document_root$fastcgi_script_name;
              include fastcgi_params;
          }
      }

runcmd:
  - systemctl restart nginx
  - |
    mysql -h demodbcampus24.mysql.database.azure.com -u adminuser -pSecurePassword123! <<EOF
    CREATE DATABASE contact_db;
    USE contact_db;

    CREATE TABLE contacts (
      id INT AUTO_INCREMENT PRIMARY KEY,
      name VARCHAR(100) NOT NULL,
      email VARCHAR(100) NOT NULL,
      message TEXT NOT NULL,
      submitted_at TIMESTAMP DEFAULT CURRENT_TIMESTAMP
    );

    CREATE USER 'php_user'@'%' IDENTIFIED BY 'secure_password';
    GRANT ALL PRIVILEGES ON contact_db.* TO 'php_user'@'%';
    FLUSH PRIVILEGES;
    EOF
Click Review + Create > Create.
9. Create an Azure Bastion Host
Note!
This resource is quite expensive. Use it with caution and don´t forget to decommision it when you are done with your exercise. This tier is necessary in order to be able to utilize the az cli for login and use a local terminal to interact with your resources. There are less costly alternatives though.
- Bastion “Developer” tier. This is free and lets you login via a web based terminal in the Azure portal.
- Inbound NAT rules in Azure Load Balancer lets you port forward ports to instances atttached to the backend pool
Navigate to Bastions > + Create.
Enter the following details:
- Name:
DemoBastion - Resource Group:
DemoRG - Region:
North Europe - Virtual network:
DemoVnet - Subnet:
AzureBastionSubnet - Public IP:
Bastion-PublicIP
Advanced
- Check: Native client support
- Name:
Click Review + Create > Create.
Verify
Go to the public IP of the Application Gateway
- Fill in the form and submit
SSH in to the App Server and verify that the record is saved in the database
Alt A: Login directly to the App Server
chmod 400 <key>
ssh -i <key> azureuser@<ip>
Alt B: Login via Bastion Host (change the subscription ID)
az account list --output table

RESOURCE_GROUP="DemoRG"
APP_SERVER_NAME="DemoAppServer"

az network bastion ssh \
    --name DemoBastion \
    --resource-group $RESOURCE_GROUP \
    --target-resource-id /subscriptions/<CHANGE SUBSCRIPTION ID>/resourceGroups/$RESOURCE_GROUP/providers/Microsoft.Compute/virtualMachines/$APP_SERVER_NAME \
    --auth-type ssh-key \
    --username azureuser \
    --ssh-key ~/Downloads/DemoAppServer_key.pem
Run the commands:
mysql -h demodbcampus24.mysql.database.azure.com -u adminuser -pSecurePassword123!USE contact_db; SELECT * FROM contacts;