2. Creating a Virtual Network with Enhanced Security
Overview
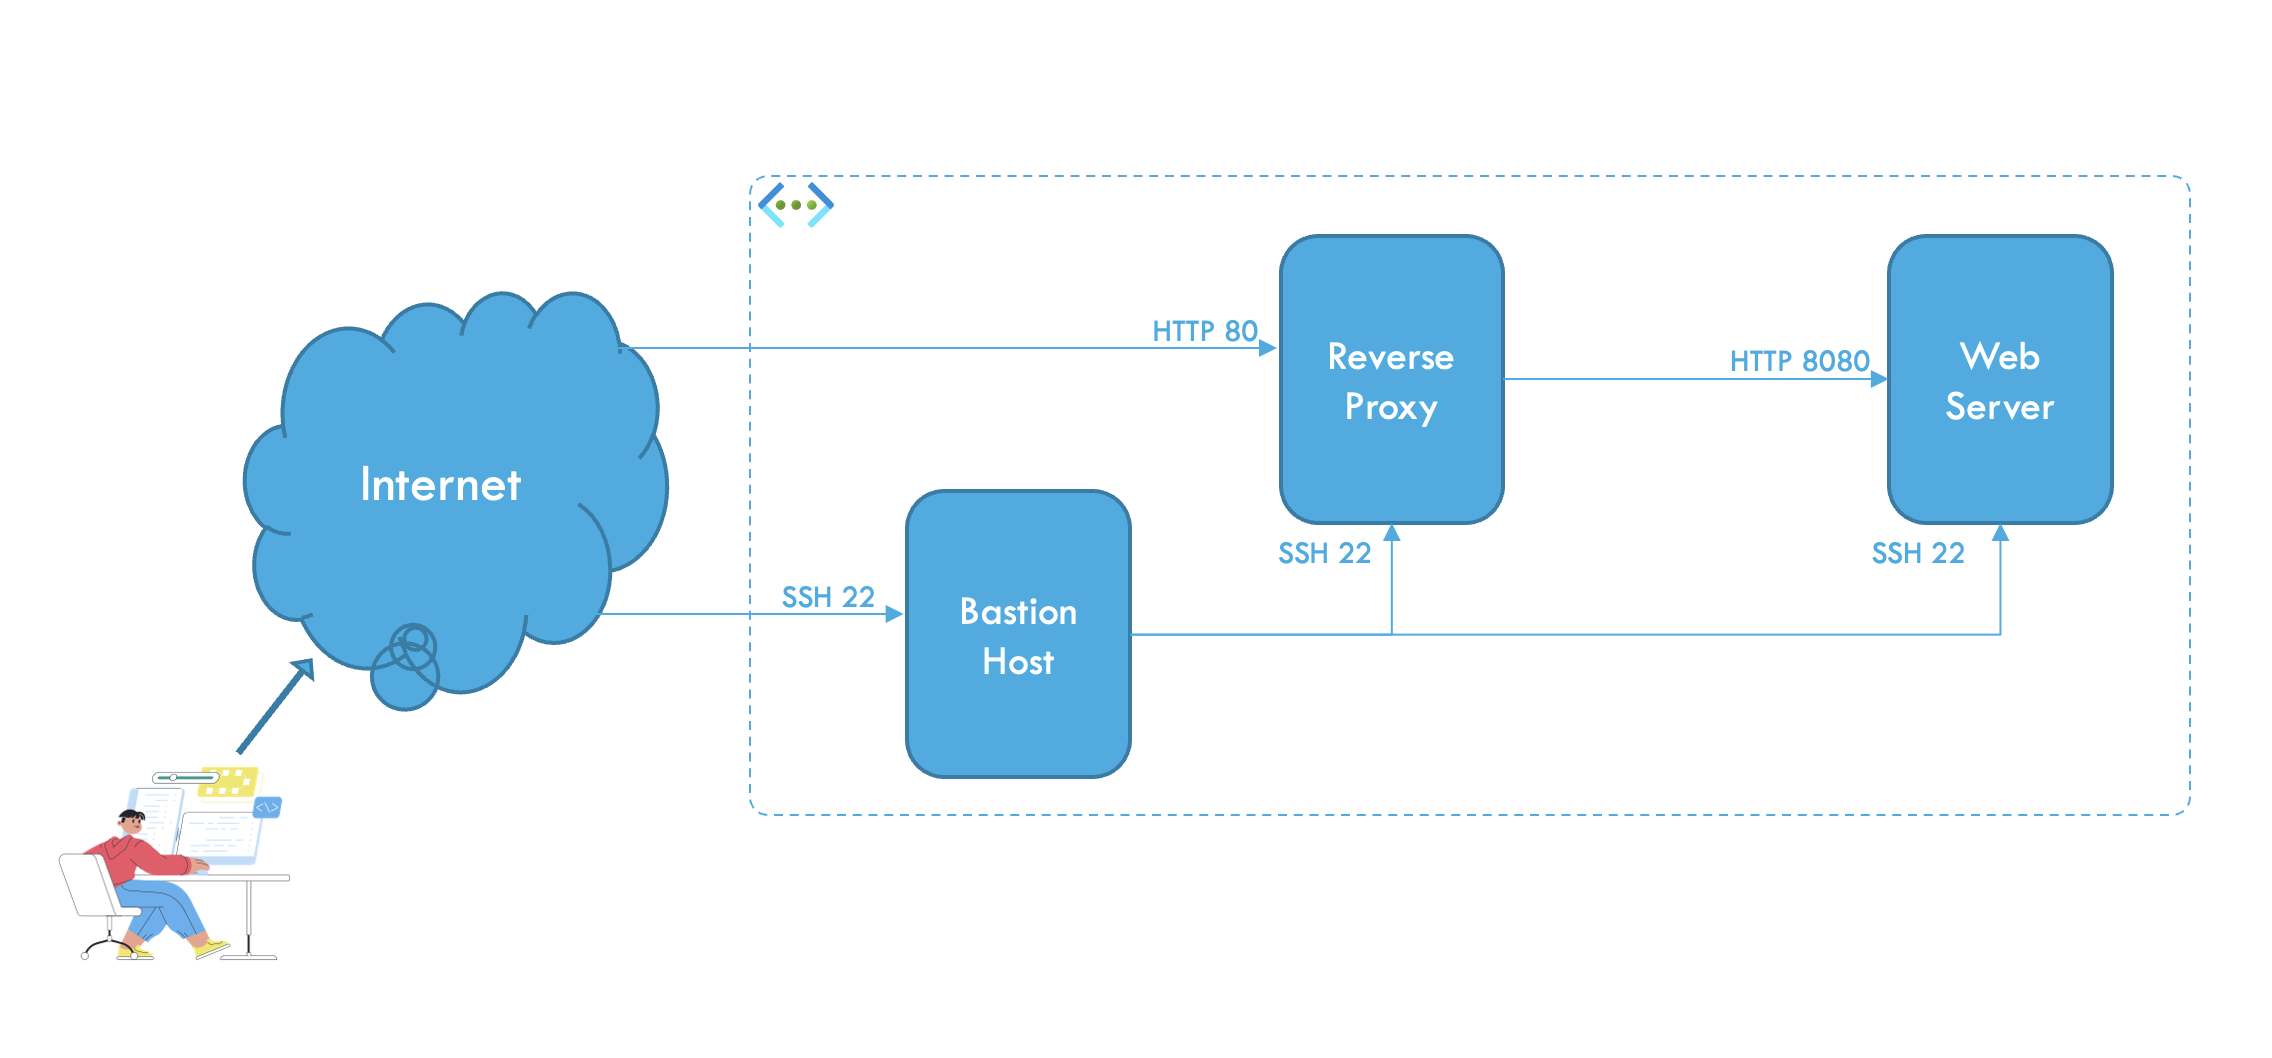
The objective of this exercise is to create a Virtual Network (vNet) with a subnet secured by a Network Security Group (NSG) attached to the subnet itself. You will also provision three servers with specific roles: Web Server, Reverse Proxy, and Bastion Host. Application Security Groups (ASGs) will be configured for the Reverse Proxy and Bastion Host, and all server configurations will be automated using cloud-init.
Step 1: Log in to Azure Portal
- Open https://portal.azure.com.
- Sign in with your Azure account credentials.
Step 2: Create a Virtual Network
- In the Azure Portal, use the search bar at the top to search for “Virtual Networks”.
- Select Virtual Networks from the search results or from the left menu
- Click the + Create button at the top of the Virtual Networks page.
- On the Basics tab, fill in the following information:
- Subscription: Select your subscription.
- Resource Group: Choose an existing resource group or create a new one (e.g.,
DemoRG). - Name: Enter
DemoVNet. - Region: Choose a region close to your location (e.g.,
North Europe).
- Click Review + Create and then click Create to deploy the Virtual Network.
Step 3: Create Application Security Groups
In the Azure Portal, search for Application Security Groups.
Create two ASGs:
Reverse Proxy:
- Name:
ReverseProxyASG - Resource Group:
DemoRG
Bastion Host:
- Name:
BastionHostASG - Resource Group:
DemoRG
- Name:
Step 4: Create a Network Security Group and Rules
In the Azure Portal, search for Network Security Groups.
Click + Create and provide the following information:
- Name:
DemoNSG. - Resource Group: Select
DemoRG. - Region: Choose the same region as the VNet.
- Name:
Got to resource and add inbound security rules:
- Go to Settings -> Inbound security rules
SSH:
- Source: Service Tag
- Source service tag: Internet
- Destination: Application security group
- Destination application security group: BastionHostASG
- Service: SSH
- Click Add
HTTP:
- Source: Service Tag
- Source service tag: Internet
- Destination: Application security group
- Destination application security group: ReverseProxyASG
- Service: HTTP
- Click Add
Attach the NSG to the
defaultsubnet in the VNet.- Go to Settings -> Subnets
- Click + Associate and select
- Virtual network: DemoVNet
- Subnet: default
Step 5: Provision VMs and Configure with Cloud-Init
- Create three VMs using the following specifications:
VM Names:
WebServer,ReverseProxy,BastionHost.Image: Ubuntu Server 24.04 LTS.
Size:
Standard_B1s.Subnet: Use
default.Public IP: Attach only to the Bastion Host and the Reverse Proxy.
NSG: Leave None for all NICs.
ASG: Attach
ReverseProxyASGto the Reverse Proxy andBastionHostASGto the Bastion Host.WebServer (
cloud-config):#cloud-config packages: - nginx write_files: - path: /var/www/html/index.html content: | <!DOCTYPE html> <html> <head> <title>Hello World!</title> </head> <body> <h1>Hello World!</h1> </body> </html> - path: /etc/nginx/sites-available/default content: | server { listen 8080 default_server; server_name _; root /var/www/html; index index.html; } runcmd: - systemctl restart nginxReverseProxy (
cloud-config):#cloud-config packages: - nginx write_files: - path: /etc/nginx/sites-available/default content: | server { listen 80; location / { proxy_pass http://webserver.internal.cloudapp.net:8080/; proxy_set_header Host $host; proxy_set_header X-Real-IP $remote_addr; proxy_set_header X-Forwarded-For $proxy_add_x_forwarded_for; } } runcmd: - systemctl restart nginx
Test and Verify
This chapter ensures the Virtual Network (VNet), Network Security Group (NSG), and Virtual Machines (VMs) are configured correctly and functioning as intended. Follow these steps to verify each aspect of the setup:
1. Verify NSG Rules
- Navigate to the DemoNSG in the Azure Portal.
- Check the inbound security rules:
- SSH is allowed only for the
BastionHostASG. - HTTP traffic is allowed only for the
ReverseProxyASG.
- SSH is allowed only for the
- Confirm that the NSG is associated with the
defaultsubnet in the VNet.
✅ Verification Step:
- Attempt SSH access from the Internet to the Web Server or Reverse Proxy. This should fail.
- Attempt HTTP access to the Web Server directly. This should fail.
- Attempt HTTP access to the Reverse Proxy. This should succeed.
2. Check Application Security Groups
- Ensure the Application Security Groups (ASGs) are correctly associated:
ReverseProxyASGis assigned to the Reverse Proxy VM.BastionHostASGis assigned to the Bastion Host VM.
✅ Verification Step:
- Navigate to the Networking section of the Reverse Proxy and Bastion Host VMs.
- Confirm the ASGs are listed under Application Security Groups.
3. Test HTTP Access to Reverse Proxy
- Open a browser or use a tool like
curlto access the Reverse Proxy’s public IP on port80. - Verify that the Reverse Proxy forwards traffic to the Web Server using its internal DNS name.
Command:
curl http://<ReverseProxy_PublicIP>Expected Output:
- The HTTP response displays the content of the Web Server’s
index.htmlpage with the message: Hello World!
4. Test Internal Communication
- Use the Bastion Host to SSH into the Reverse Proxy using the private IP address.
- From the Reverse Proxy, test internal DNS resolution and HTTP connectivity to the Web Server.
Commands:
ssh azureuser@<BastionHost_PublicIP>
curl http://webserver.internal.cloudapp.net:8080
Expected Output:
- The DNS name
webserver.internal.cloudapp.netresolves to the Web Server.- The HTTP response from the Web Server shows the
index.htmlpage with the message: Hello World!
5. Verify Security Configuration
- Confirm that:
- SSH is accessible only via the Bastion Host.
- HTTP traffic to the Web Server is routed only through the Reverse Proxy.
- Direct Internet access to the Web Server is blocked.
Summary of Verification Steps
- NSG and Subnet: Ensure the NSG is applied correctly to the subnet, restricting access as per rules.
- ASG Configuration: Verify the ASGs are correctly assigned to the Reverse Proxy and Bastion Host.
- Internal DNS: Validate that the Reverse Proxy uses the Web Server’s internal DNS name for communication.
- Cloud-Init Automation: Ensure the Web Server and Reverse Proxy are configured correctly via
cloud-configwithout manual intervention.