1. Creating a Virtual Network (vNet)
Overview
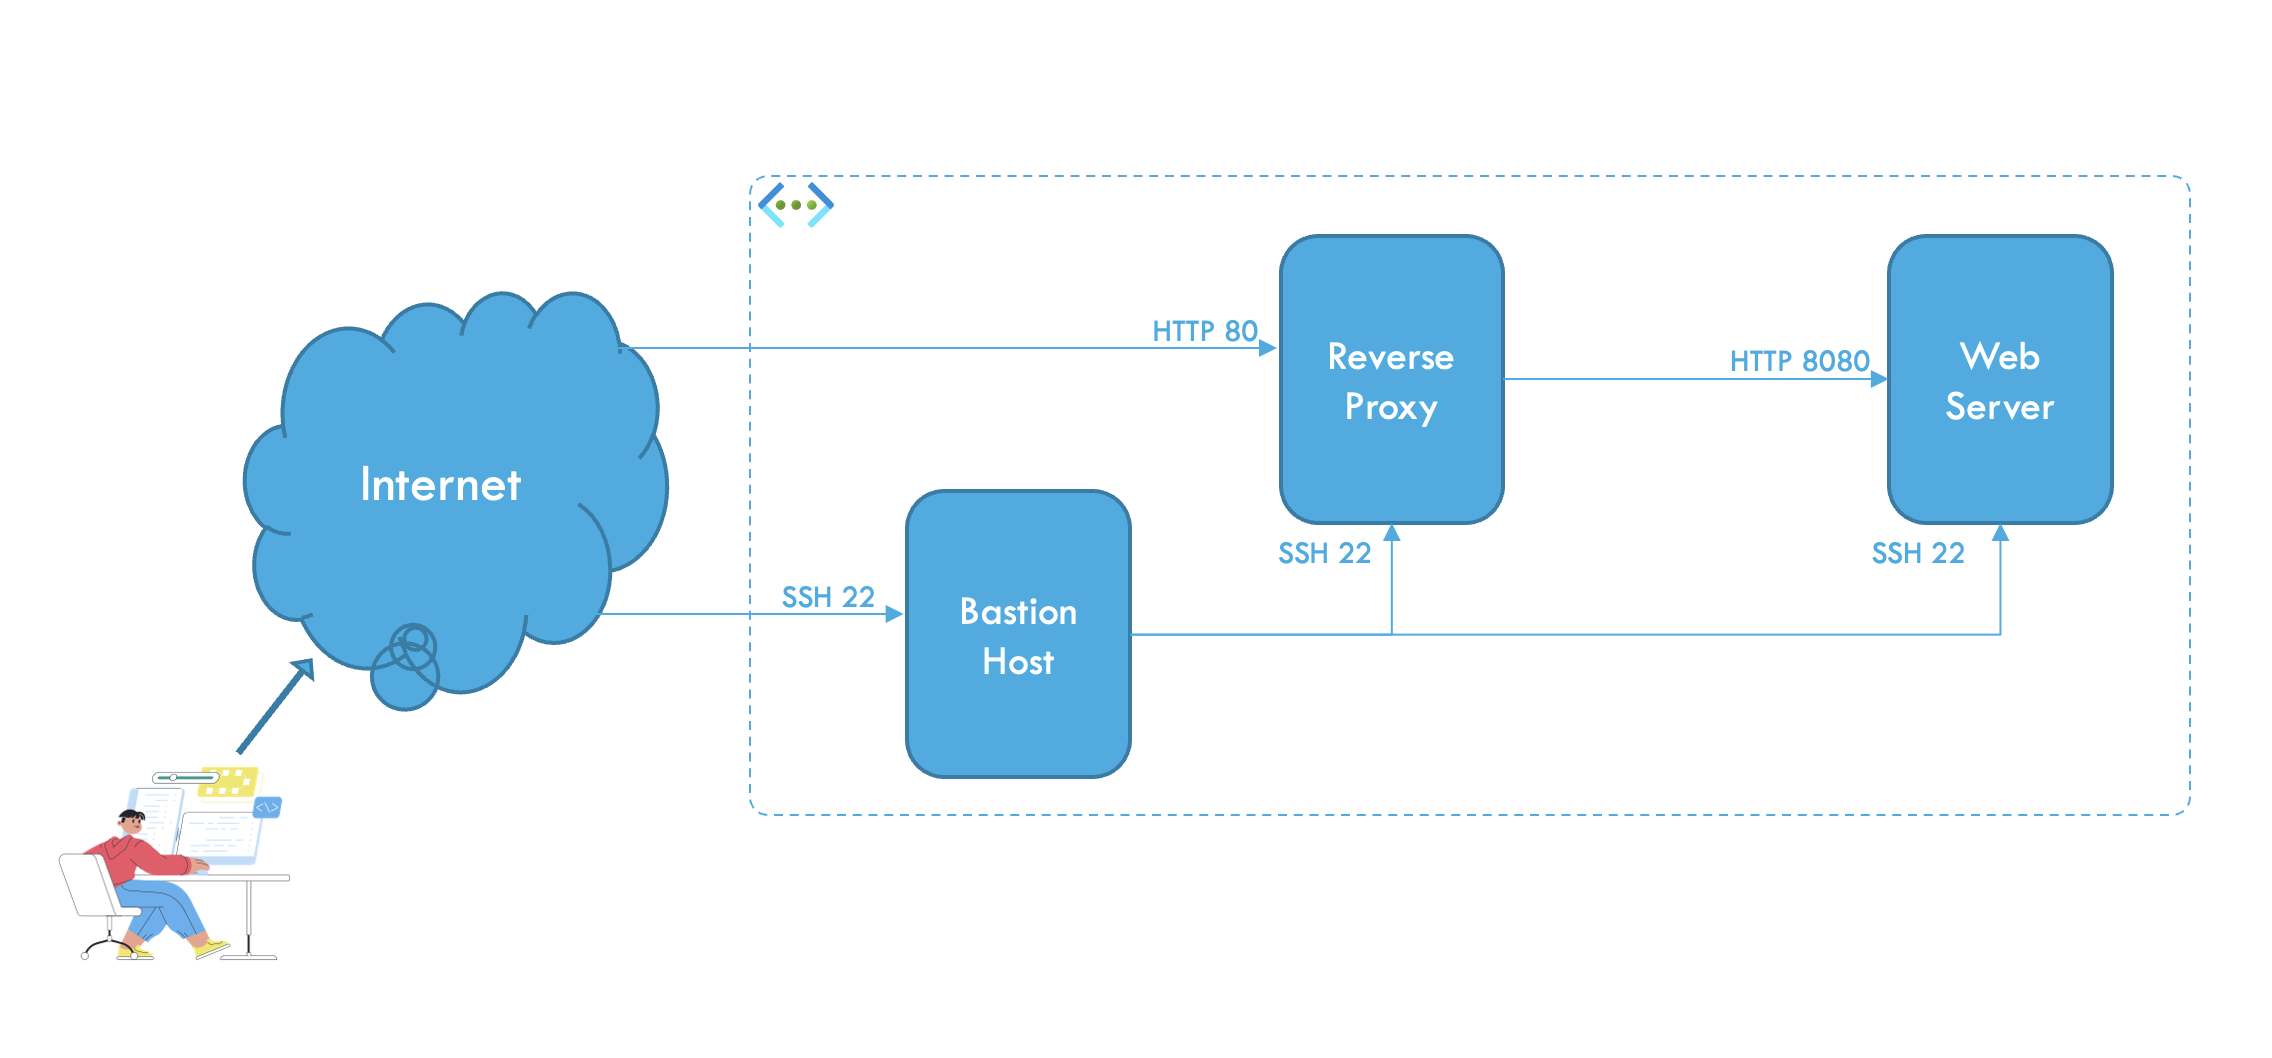
The objective of this exercise is to create a Virtual Network (vNet) with a default subnet using the Azure Portal, laying the foundation for a secure network architecture. You will also provision three servers having the roles Web Server, Reverse Proxy and Bastion Host respectively. Finally, firewall rules will be created to secure the network using Azure Network Security Groups (NSG)
Step 1: Log in to Azure Portal
- Open https://portal.azure.com.
- Sign in with your Azure account credentials.
Step 2: Create a Virtual Network
- In the Azure Portal, use the search bar at the top to search for “Virtual Networks”.
- Select Virtual Networks from the search results or from the left menu
- Click the + Create button at the top of the Virtual Networks page.
- On the Basics tab, fill in the following information:
- Subscription: Select your subscription.
- Resource Group: Choose an existing resource group or create a new one (e.g.,
DemoRG). - Name: Enter
DemoVNet. - Region: Choose a region close to your location (e.g.,
North Europe).
- Click Review + Create and then click Create to deploy the Virtual Network.
💡 Information
- A Virtual Network (VNet) is the foundation of a cloud-based network.
- Subnets allow logical segmentation within the VNet for better security and resource management.
- The address space
10.0.0.0/16allows over 65,000 addresses, and subnets divide this range into smaller, manageable blocks (in this case thedefaultsubnet10.0.0.0/24)
✅ Verification Step:
- After deployment, return to Virtual Networks in the Azure Portal.
- Select the
DemoVNetfrom the list of Virtual Networks.- Confirm that the following settings are present:
- Address Space:
10.0.0.0/16.- Subnets:
defaultwith address range10.0.0.0/24.
Step 2: Provision an Ubuntu VM in the VNet/Subnet (Web Server)
- In the Azure Portal, go to “Virtual Machines”
- Create a New Virtual Machine
Click + Create at the top of the Virtual Machines page.
Subscription: Select the subscription used in Step 1.
Resource Group: Select the same resource group as before.
Virtual Machine Name: Enter a name, e.g.,
WebServer.Region: Use the same region as the VNet.
Image: Choose Ubuntu Server 24.04 LTS.
Size: Select a small size, e.g.,
Standard_B1s.Administrator Account:
- Authentication Type: Select SSH Public Key.
- Username: Enter
azureuser. - SSH Public Key: Generate new key pair.
Go to the network tab
- Under Virtual Network, select the VNet created in Step 1.
- For Subnet, choose the default subnet created in Step 1.
- Public IP: Ensure a public IP address is assigned.
- NIC Network Security Group: Select Basic and allow SSH (port 22).
Go to the advanced tab
- Use custom data to install nginx
#!/bin/bash

apt update
apt install nginx -y
Click Review + create and then Create.
Step 3: Configure the Web Server
Login to the WebServer and change the default Nginx page to “Welcome World”
Run the following commands to change the port nginx listens to (just for this exercise to show that web servers and app servers can potentially listen to many different ports.
8080is a very common port to use)sudo sed -i 's/listen 80 default_server;/listen 8080 default_server;/' /etc/nginx/sites-available/default sudo sed -i '/listen \[::\]:80 default_server;/d' /etc/nginx/sites-available/default sudo nginx -s reload sudo sed -i 's/Welcome to nginx/Hello World/g' /var/www/html/index.nginx-debian.html✅ Verification Step:
- Run curl and verify output from default page
curl localhost:8080
Step 4: Provision another Ubuntu VM in the VNet/Subnet (Reverse Proxy)
- Create another identical VM (including installing Nginx)
- Name it
ReverseProxy
Step 5: Configure the Reverse Proxy
Login to the ReverseProxy and run
curl <PrivateIP_WebServer>:8080✅ Verification Step:
Verify output from default page of the Web Server
💡 Information
- There is no firewall between servers in the same network
- You can also use the private IPs within the same vNet
In order to give the Reverse Proxy its role as “Reverse Proxy” we need to edit the file
/etc/nginx/sites-available/default. Replace the content with this (change the Private IP and Port):sudo nano /etc/nginx/sites-available/defaultserver { listen 80 default_server; location / { proxy_pass http://<PrivateIP>:<Port>/; proxy_http_version 1.1; proxy_set_header Upgrade $http_upgrade; proxy_set_header Connection keep-alive; proxy_set_header Host $host; proxy_cache_bypass $http_upgrade; proxy_set_header X-Forwarded-For $proxy_add_x_forwarded_for; proxy_set_header X-Forwarded-Proto $scheme; } }sudo nginx -t sudo nginx -s reload curl localhost✅ Verification Step:
Verify output from default page of the Web Server
💡 Information
Nginx is a very versatile software that beside being used for web servers it is also very often used for reverse proxies.
Step 6: Provision another Ubuntu VM in the VNet/Subnet (Bastion Host)
- Create another identical VM (but don´t install Nginx)
- Name it
BastionHost
Step 7: Use the Bastion Host to SSH in to the other servers
Login to the Bastion Host.
Try to login to the other two servers from here.
💡 Information
Each server has its own ssh key. We don´t want to store the keys on the Bastion Host, instead we use an ssh agent to bring the keys to the other servers in memory to the Bastion Host.
Exit the terminal, so that you are back on your laptop
Start the SSH Agent, on your laptop, and give it the keys:
eval $(ssh-agent)
ssh-add ~/Downloads/WebServer_key.pem
ssh-add ~/Downloads/ReverseProxy_key.pem
ssh-add ~/Downloads/BastionHost_key.pem
ssh-add -l
SSH Jump via BastionHost using the Agent (
-A):ssh -A azureuser@<BastionHost_IP>Inside the BastionHost, try to SSH into WebServer using its private IP:
ssh -A azureuser@<WebServer_InternalIP>✅ Verification Step:
Verify that you could SSH into the Web Server
Step 8: Secure the solution with NSG (Network Security Groups)
Currently there is one NSG for each NIC of each server. You will find the firewall rules in each NSG under the menu Networking -> Network settings for each VM.
Modify the NSG of the Web Server
- Navigate to the
WebServerVM - Select the menu Networking -> Network settings
- Follow the link
WebServer-nsg - Delete the row with the SSH rule.
✅ Verification Step:
- Verify that you cannot SSH into the Web Server from the Internet
- Verify that you can SSH into the Web Server from the BastionHost
- Verify that you cannot browse (HTTP) into the Web Server from the Internet
- Verify that you can browse (HTTP) into the Web Server from the ReverseProxy
- Navigate to the
Modify the NSG of the Reverse Proxy
- Navigate to the
ReverseProxyVM - Select the menu Networking -> Network settings
- Follow the link
ReverseProxy-nsg - Delete the row with the SSH rule.
- Select the menu Settings -> Inbound security rules
- Click + Add
- In Service, choose HTTP
- Click Add
✅ Verification Step:
- Verify that you cannot SSH into the Reverse Proxy from the Internet
- Verify that you can SSH into the Reverse Proxy from the BastionHost
- Verify that you can browse (HTTP) into the Reverse Proxy from the Internet
- Verify that you get the page served by the Web Server (Hello World)
- Navigate to the
Conclusion
By completing this exercise, you achieved the following learning outcomes:
- VNet Creation: Established a Virtual Network with a subnet to provide a secure foundation for cloud infrastructure.
- VM Provisioning: Deployed and configured VMs with specific roles (Web Server, Reverse Proxy, Bastion Host) to simulate a functional network.
- Nginx Configuration: Explored the use of Nginx as a web server and reverse proxy.
- Secure Networking: Applied Azure NSGs to enforce access control and secure the environment.
- SSH Agent Forwarding: Practiced secure internal server management without exposing sensitive credentials.